30 October 2012

At First Sight: Palmer's Eventone BB Creams

Since the explosive trend of BB creams (blemish balms) across Asia, I can pull out a handful (make that two handfuls actually!) of brands/companies from the top of my head who've jumped on the BB bandwagon. And as far as I know.. there has not been one BB cream from the West which has lived up to the hype..


However, in saying that, I'm actually always excited to see Western brands hitting up with their very own BB cream formulas... Full coverage products with awesome skincare benefits makes every make-up enthusiast's dream.

Anyways, Palmer's has recently just released their very own Eventone BB Cream! I was shocked (for real!) when I received information on the new release since 'Australia's 1st BB Cream' *ahem* Garnier *ahem* didn't do me well. Meep. And not to mention I never really expected a BB cream from Palmer's!


I haven't used the product long enough to review it yet, so I'm gonna give it a while more! But here are my first thoughts...
  • Wow. The consistency is quite thick.
  • Holy cow, the shade 'Fair/Light' is VERY light. Let's check out 'Medium/Dark'....

Eventone BB Cream swatches: Fair/Light, Medium/Dark

  • Medium/Dark is too dark. Lucky I have both shades! ^_^"
  • Soft dewy glow, me likey.... it's also not caking/flaking on my dry cheeks!
  • Nice coverage!

6 hours later....

  • Hi Eventone BB Cream. You still on my face. K coolcats! 

Yeap. My first impressions! I'm gonna give these BB creams a longer trial period, but I'm pretty impressed by the coverage it offers -- a bit much like medium coverage. Seems buildable though!

I was so surprised that it didn't cling onto the dry patches on my cheeks.. Thank god (in this case, thank you Palmer's!).. and it has a matte finish.. which I would've preferred to be dewy. It also settles down really quick so work fast or else you'll be struggling to blend.

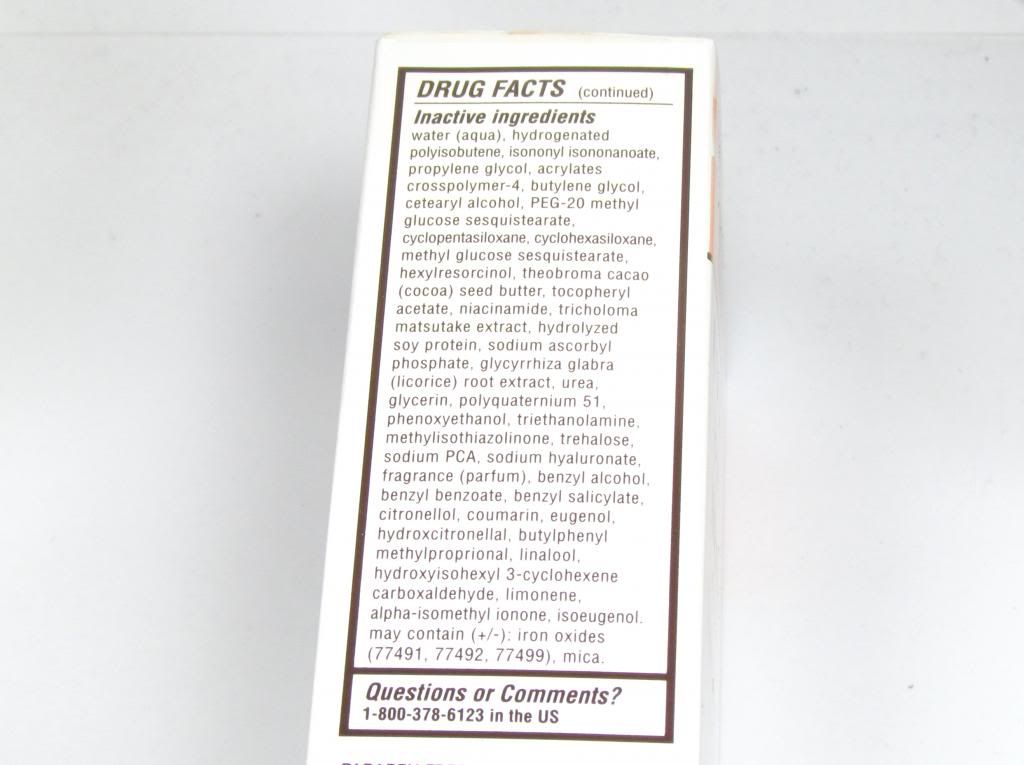
Click for larger view

Of course, keep in mind these are just my first impressions so if you're a keen bean for a full review, don't forget to check back here in the next weeks!


Were you surprised by Palmer's release of their new BB Cream?

Will you be giving it a try?


Palmer's Eventone BB Cream retails for $9.99 and is available exclusively to My Chemist and Chemist Warehouse as of October 2012. However, will be available to other stockists as of January 2013.

Disclaimer: Product was provided for review. All opinions within this post remain uninfluenced and unbiased. Please refer to my disclosure policy for more information.

28 October 2012

Throwback: Last year's Halloween Make-Up Attempts

I know I know! I know we don't celebrate Halloween here in Australia (I wish we did *sad) but that doesn't stop me from trying out the wicked and whack make-up looks! Unfortunately I'm extremely busy this year throughout October and it's impossible for me to whip up any Halloween looks, but meanwhile.. check out some stuff I tried last year! :P


I'm a big fan of horror movies (if you didn't know) so as soon as I finished watching 'The Slit Mouthed Woman' also known as 'Carved', I figured that I HAD to try recreating that slit mouth!!

So here's my lousy first time attempt...

Original post here >

The slit looked quite 'meh' so I will make sure to try again next year although I was really hoping to attempt it again this year... I can't believe I'm giving up on Halloweeeeen make-up because of my stupid assessments! Meep!


I also really liked the Chucky series (a must watch! It's so funny!), so I thought I'd try a dark, gothic make-up look inspired by Tiffany (Chucky's wife from Bride of Chucky!).

Original post here >

Again, my lousy work... brows are uneven (yikes!) and it wasn't even concealed at all..

All in all, I should've been more organised, but don't you worry! I have ideas for next year's Halloween already! Hehehe!

I also wished Halloween was a bigger thing in Aussie (although I wouldn't really know what I'm celebrating)! All day watching fabulous Halloween make-up tutorials and not being able to wear them out because there's no such celebrations in Aussie.. sucks!

25 October 2012

Colour Me In -- WRAP UP!

'Colour Me In' is a series of posts in collaboration with Alice of ArsyParsy, Tezza of Myteeefine and Amanda of Thai-Tales!
*****


Hiiii little peanuts! 

No 'Colour Me In' post this Thursday as it's time for a wrap up of this series! :D

Amanda, Tezza, Alice and I sure did have lots of fun collaborating for this series of post and we hope you enjoyed every single post from every one of us!

I'll be wrapping up my series of posts with this funky new navigation idea!


Just rollover and click! Easy peasy!
(Opens in new window for your reading convenience ;D)


Cute right?!


Thank YOU so much for all your support and positive feedbacks on our little collaboration!

Don't forget to hop to Amanda's, Alice's and Tezza's blog for their wrap up of this series!

23 October 2012

DIY Nail Rack -- where to purchase tools & materials in Australia?

If you follow me on Instagram and Twitter, you would probably know that I've successfully made a DIY nail rack a few weeks ago, after spending ages to figure out how to store my nail polishes!

Being a happy chap, I wanted to share with you guys on how I made it, how long it look and where I purchased the tools and materials (in Sydney, Australia)!


I actually didn't follow any particular DIY Nail Racks guides on YouTube, to be honest. I had a quick look at this video and it's pretty much just common sense!


Of course, I measured the spaces in between each row to suit the different heights of my nail polishes and I just left the top row open instead, so I can hold taller nail polishes.


Materials & Tools (in Sydney, Australia)


  1. Metal Ruler -- check Bunnings Warehouse, Big W or borrow from a neighbour or relative (anyone who does construction, timber-work should have one of these!). I didn't use one, but I'd suggest it as it's sturdier, more exact in measuring units and sharp utility knives can't cut into it (like it did to my regular wooden ruler). 
  2. Foam boards (also known as foamcores, I believe) -- can be found at your local arts&crafts stores (such as Riots Art & Craft). Available in different sizes and thickness. I purchased 3 pieces for my nail rack at ArtMax (Liverpool, Sydney) for $7/piece. 
  3. Hot Gluestick Melts -- $5 for a pack of 24 at Big W. 
  4. Hot Glue Gun -- Big W's craft section. $10 - $15. Borrow from someone if you can!
  5. Utility Knife -- sharp as hell, so do be careful with it! Very easy to find. You can check Bunnings Warehouse, Big W, Asian bargain stores, etc........... or just borrow again. 

The only items I purchased were the foamboards, hot glue gun and hot gluesticks, totalling to $35-$40 (which is okay). The hot glue gun and gluestick melts are with me to stay, and I still have a very large piece of foamboard left! Will make another nail polish rack... :P


Question time! Here are a few things many people question:
Q. Is hot glue strong enough? 
A. I know hot glue doesn't look that promising, but it is super strong for crafty projects! I actually didn't think it'd turn out very sturdy either, but I was wrong! :P 
Q. How many nail polishes can it hold?
A. This depends on the size of your nail polishes and how wide your nail rack is! Mine can hold up to 14 OPI nail polishes and I have 8 rows so that's at least 112 nail polishes! 
Q. How long did it take you?
This nail rack took me about 4-5 hours to make because I'm a very keen bean -- I can't leave things unfinished >:[

Of course if you have any questions, leave me a comment below! ^_^ I'd be more than happy to help/answer!

This DIY project was super easy to do. It just took a long time because I had to be very exact on the measurements so the nail rack didn't look sloppy.. but it's totally worth it!


*Some images used in this post do not belong to us. If you are the owner of any of these images and do not wish for it to appear on our site, please contact us

18 October 2012

Colour Me In: White -- A guide to basic highlighting

'Colour Me In' is a series of posts in collaboration with Alice of ArsyParsy, Tezza of Myteeefine and Amanda of Thai-Tales!

*****


Hoooray! It's Thursday again! We're one day away from the weekends, hang on tight everybody!
This week's focus colour is 'white' and with no doubt, the first make-up product I turned to were highlighters -- my ultimate favourite cosmetic product of all time!


Highlighters are light reflecting, no coverage cosmetic products which helps to accentuate the planes of our face and can also help to 'fake' that healthy, radiant glow! Strictly not to be confused with illuminators

Highlighters can be, and are usually more 'intense' with its light reflecting properties and should only be applied over the high planes of the face. 
Illuminators, on the other hand, are more subtle and luminious in finish and can be used to mix with coverage products such as foundations or tinted moisturisers for an all over dewy glow. Illuminators can definitely double up as a 'subtle highlighter', but never vice versa.


So how do we highlight?

1. Know your skin's undertone and pick a tone!
Just like foundations, highlighters are also available in a variety of undertones (such as pearly whites, golds and pinks) to cater to our individual preferences and complexions.
Whites = generally suited to both complexions
Golds = suited to warmer skin tones
Pinks = suited to cooler skin tones


2. Know your occasion and pick a finish!
If you're looking forward to a big event, you should definitely take into consideration whether flash photography will be involved or not.
Pearl finishes = ideal for day events with the intense and shimmery glow it offers. For evening events which usually does involve flash photography, pearl finishes do have the potential to fake an oily glow, rather than a radiant glow (and you don't want that!). 
Matte/satin finishes = more subtle and are more about creating dimensions of the facial planes. Such subtle finishes are generally suited for both day and evening events. Matte/satin finishes are quite hard to find, but can be substituted by a foundation 1-2 shades lighter than the skintone.


3. The basic highlighting guide with each finish.


Highlighters with pearly finishes are pretty intense, so I would suggest to only highlight on the highest planes of the face such as the cheekbones, brow bones, nose bridge (lightly) and cupid's bow.

Skip the chin, skip the 'triangle' highlighting method and skip the forehead with pearly finishes or you'll look overly pearly and shimmery!


As for matte/satin finishes which are much more subtle.. just go crazy with it! Highlight the centre of the forehead, brow bones, nose bridge, cupid's bow, chin and cheekbones.

For the cheekbones, you can go ahead with the triangle highlighting method (what Kim Kardashian does) for a more chiselled and sculpted look. This method will also brighten up your complexion and eye area, but make sure you conceal your dark circles well or it'll put emphasis on your dark circles instead!


4. A few affordable highlighting/illuminating products you may want to know about!


1. L'Oreal Paris Lumi Magique Concealer (works better as highlighter than concealer, satin finish) $26.95
2. Face Of Australia Mineral Therapy Illuminating Pearls (highlighter, slight pearly sheen) $14.95
3. Face Of Australia Mineral Therapy Liquid Illuminators (illuminator) $14.95
4. L'Oreal Paris Lumi Light Concentrated Primer (primer, but better as highlighter, light pearly sheen) $29.95

The only product from the list that I haven't tried yet is the Face Of Australia Liquid Illuminator, but I've heard so much good stuff about it so I thought I'd share that with you! :)


Your turn to share!

What is your favourite, go-to highlighting product?
Is it the well-loved Benefit High Beam? The YSL Touche Eclat Pen Highlighter?  


Don't forget to hop over to my dearest bblogger friends to check out their post! :)

16 October 2012

Pretty in Pink Party with Bellabox's October Edition!

Okay, so I'm actually not a monthly subscriber of any beauty subscription box services as I've figured they're really not for me.. I'm more about make-up than skincare or haircare!


But I thought I'd snatch up this month's Bellabox since they've announced an awesome free OCC Lip Tar deal for every new subscriber.. which is totally worth it since the Lip Tars itself are $15.00 at IMATS!

So to receive a box full of beauty goodies and a free OCC Lip Tar.... why not?!


This month's Bellabox is themed 'Pretty in Pink Party' in celebration of Bellabox's 1st birthday and to support the National Breast Cancer Foundation.. Bellabox will be donating $1 from each October box!

Opened up the box to a pink party... :')


Products I've received:

  • Cedel Blow Dry Faster Hair Protector (full sized, $9.99)
  • Estee Lauder Resilence Lift Instant Action Lift Treatment (sample)
  • Clinique Turnaround Concentrate Extra Radiance Renewer (sample) 
  • DKNY Fresh Blossom Eau So Intense (sample)
  • Carmex Moisture Plus Lip Balm in Sheer Pink Tint (full sized)
  • E.L.F. Cosmetics Brightening Eye Colour (full sized, $3.99)
  • Sally Hansen Insta-Dri Fast Dry Nail Colour (full sized, $13.95)
  • Yummy Chocolatier Pink Heart Chocolate

...and my OCC Lip Tar in Pageant, of course! :P


I'm pretty impressed with what I've received for this month! I know I'd bring all four full-sized items into use! I already own the Cedel Blow Dry Faster and Carmex Lip Balm which I do really like, so it won't hurt having extras! And the OCC Lip Tar is really a big bonus! 

As for the 3 skincare and fragrance samples, I probably won't use them any time soon.. just because my skin have been playin' up and I don't use fragrance samples.

Super happy with this month's box though! I do think the box is still great value even without the OCC Lip Tar deal.. ^_^ 


Are you subscribed to any beauty box services? 
What do you think of this month's Bellabox?


Bellabox is a monthly beauty box subscription, you can subscribe at their official website.

15 October 2012

Bullet Proof Nails with Mirenesse

Hi. I hope everyone had a wonderful weekend because it's time to get your suit back on for work. Boo ya! Hah!

Lucky for me.. no classes on Monday, so here I am.. sippin' on my cuppa tea whilst playing with pretty Bullet Proof Nail Lacquers by Mirenesse!


I've received 3 shades to play with... Charleston Me, Flapper Pash and Berry Boa. 

Of course, the very first shade I've picked to trial was Charleston Me. As you can see, it is amazingly sparkly so it stood out to me as the most exciting colour of the three!


Charleston Me is such a pretty, amazing, gorgeous, beautiful, <insert other lovely words> shade! It has a metallic purple base, full packed of silver shimmers.. too pretty for words :')

I'm super impressed with the formula as it still remained so sparkly after 4-5 days wear as foily nail polishes like this usually fades down after a day. Truly my favourite out of the bunch!


Flapper Pash, I actually thought was just your typical pink shade from what it looks like in the bottle, but it applied much brighter, maybe a teeny tad neon, but not quite. I was pretty surprised as to how bright it looked in comparison to what it looked like in the bottle!

Although I probably have 15-20 shades of pink in my nail polish collection, I can't find one to compare to Flapper Pash -- poppy, but cute!


Berry Boa also applied brighter and lighter than what it looks like in the bottle. In the bottle, it looks much like a dark vampy red shade, but I do like the colour better when it's applied! Very much like a vintage red... so classy and beautiful!


Overall, Mirenesse has done a great job with these nail polishes! Talk about perfect consistency, smooth application, great pigmentation with hi-shine finishes.. I really have no complaints!

However, for my budget, $29.95 a pop is rather pricey, but if you can afford em.... go wild!


Have you tried Mirenesse Bulletproof Nail Lacquers? 
Which is/are your favourite shade(s)?


Mirenesse Bulletproof Nail Lacquers are $29.95 each, available at their official website. Ships within Australia only.

11 October 2012

Colour Me In: 3 Black Mascaras on my Miss List!

'Colour Me In' is a series of posts in collaboration with Alice of ArsyParsy, Tezza of Myteeefine and Amanda of Thai-Tales!

*****


Another Thursday, another 'Colour Me In' collaboration post!

A few more Thursdays to go and we will be rounding up this collaboration series of 'Colour Me In'! Of course, that doesn't mean that's all for us four.. we'll still be blogger budz and you'll definitely see me feature their links on my blog! :P

This week's colour is 'black' and if you know me, you would know I'm boring as hell so it's really no surprise that I'd be featuring eyeliners or mascaras! :P


But to switch things up from the usual 'what's on my hit list', let's skim through and see what's on my mascara-miss list!


Covergirl Lash Blast -- this one, is nice, but I do think it's a bit over-rated. It gives nice volume, some length, separates well, but makes your eyelashes stiff as hell in return! Although I don't really care for stiff lashes, I've found the same results in other mascaras without the stiffness, so... ya. I do like that this mascara is easy to access and the colour is very black, but I personally don't think it's anything amazing for my Asian lashes, so farewell Lash Blast!


Top: Lash Blast, bottom: Lash Blast Length

Covergirl Lash Blast Length -- is quite disappointing. The wand is awkwardly long, but the bristles do remind me of my once-upon-a-time favourite Rimmel London Glam Eyes Mascara. It separates really well, but perhaps too well that all my lashes look like they are 10 miles apart from each other. LMAO. (Yeap, call me the Queen of Over-exaggeration).

Jokes!! But it does do its job at separating, except that it doesn't really separate evenly. Adding to that, I just can't seem to get an 'even' lengthening application with the wand, so altogether it makes me look like I have unevenly seperated, wonky lashes. Meep.


Maybelline Colossal Volum Express -- I've heard alot of beauties raved about this mascara so I was excited when my sister received this as a gift! However, its wet formula doesn't work on my Asian lashes at all.. It's way too heavy for my lashes, weighing it down (which is the last thing I want for my lashes) and clumping it together. I think most beauties who adores this mascara, are already blessed with naturally long eyelashes, so it's a totally different take for my Asian eyelashes.


Of course, these are just brief overviews! I do hope to review them in the upcoming future, but your turn to share now...


Which mascaras just doesn't work for you?

Whether it be low-end or high-end, let us know!


For this week's line up of posts, Alice will let you know how well Revlon's ColorStay Liquid Eyeliner performs, whilst Tezza will be sharing thoughts on 4 different eyeliners... As for Amanda, there's a Benefit Lash Battle happening at her page for Benefit fans!


Disclaimer: Products mentioned in this post were purchased/gifts from friends.

09 October 2012

Parissa Home Wax for this Summer -- Giveaway!

Giveaway only open to Australian residents.

So I know that it's only mid-Spring here in Australia, but I'm so pumped for Summer already! With only a little less than two months to get ready for Summer... I have everything planned out!

On my list to buy/do:
  • Pretty and cute triangle bikinis
  • Cute hats!
  • Sunnies
  • Exercise and tone body
  • Plan out beach days with family and friends!

As you see, I'm pretty damn planned (ok not really LOL)! But THEN I realised there's something I've never thought about until a representative PR from Parissa contacted me to host a giveaway for you (my lovely readers!)...


Um.. hair removal for body hair.....


Yikes! So glad that I was contacted by the lovely Laura... Else you'll be seeing me this Summer in a cute bikini at the beach with hairy legs (and bits lol!).. I kidz. 

So lovely Laura sent over to me a pack by Parissa to try after a mini-consultation! I've received Parissa's Chamomile Body Sugar (for legs, body and face) which is suitable for my fine-light hair and my awesome nooby beginner waxing skills.


The Body Sugar came with the body sugar, Azulene Oil, alot of strips, a few wooden spatulas and a very detailed pamphlet about the product! I felt quite overwhelmed opening the box as I felt like it came with a whole salon (with so many strips, spatulas, etc)..


Of course, I started with my sister's moustache! ^_^


The Body Sugar works pretty well although you definitely need to give it a few go's to make sure that you've removed all hairs. It's also very gentle on the skin and is washable which is very suitable for noobies like myself! 


GIVEAWAY TIME!! :)


Parissa is being very generous with today's prize giveaway prize packs.. They are offering 3 prize packs for my readers, so there will be 3 winners! Yay!

Over a mini-consultation via email, winners will receive a Hot Wax pack with Azuene Oil suited to their hair types and waxing experiences!


Terms & Conditions:
1. This giveaway (Parissa Hot Wax packs with Azulene Oil x 3) ends on 23 October 2012, at 12:00 PM (Sydney time). The prize packs will be suited to your hair type and waxing experiences after a mini-consultation.
2. Winners will be selected randomly via PunchTab.
3. This giveaway is only open to Australian residents.
4. Winners will be contacted by myself after the giveaway ends, and winners must reply to the email within 48 hours. Fail to reply within the 48 hours time frame, another winner will be re-selected.
5. Contact details of winners will be passed onto Parissa's representative PR.
6. After passing on your contact details, it is up to you to contact the PR to consult about which product will be most suitable for you.


Disclaimer: The product mentioned in this post was provided for trialling purposes. However, opinions stated within this post are of my own and remains uninfluenced. 
Related Posts Plugin for WordPress, Blogger...